An Introduction to Infopath 2010 - Part-1 - An Overview
An Introduction to Infopath 2010 - Part-2 - Creating Basic Forms
In this post we will see how easily we can create Cascading Dropdown controls in Infopath 2010 Desinger tool.
Most of the times in our applications Cascading Dropdown (When there is change event for one of the combo box should reflect the values in another combo box. For example when we change the Country in the country Combobox, then the states should reflect in the State Combobox for the selected country) is a common requirement. Right now in SharePoint we are achieving this requirement by using JavaScript or a JQuery.
Infopath 2010 made our job more easy by providing this functionality out-of-the-box. Now we will see a sample for creating a form to demonstrate the Cascading Dropdown functionality.
Step-1: Creating a Sample Form
Create a sample form as shown in the following picture with two dropdown list controls for Country and State.
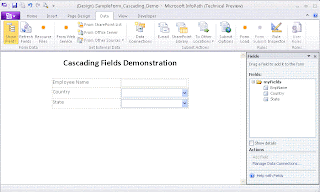
Step-2: Creating an XML file
For this example we are considering xml as a data source. Following is the xml format for storing the Country and State data:
<?xml version="1.0" encoding="UTF-8"?>
<root>
<country displaytext="India" displayvalue="India">
<state displaytext="Karnataka" displayvalue="Karnataka"/>
<state displaytext="Andhra" displayvalue="AP"/>
<state displaytext="Maharastra" displayvalue="Mumbai"/>
</country>
<country displaytext="US" displayvalue="US">
<state displaytext="Alabama" displayvalue="1"/>
<state displaytext="Alaska" displayvalue="2"/>
<state displaytext="Arizona" displayvalue="3"/>
<state displaytext="Arkansas" displayvalue="4"/>
<state displaytext="California" displayvalue="5"/>
<state displaytext="Colorado" displayvalue="6"/>
<state displaytext="Connecticut" displayvalue="7"/>
<state displaytext="Delaware" displayvalue="8"/>
<state displaytext="Dist Columbia" displayvalue="9"/>
<state displaytext="Florida" displayvalue="10"/>
<state displaytext="Georgia" displayvalue="11"/>
<state displaytext="Hawaii" displayvalue="12"/>
<state displaytext="Idaho" displayvalue="13"/>
</country>
<country displaytext="China" displayvalue="China">
<state displaytext="Anhui" displayvalue="1"/>
<state displaytext="Beijing" displayvalue="2"/>
<state displaytext="Fujian" displayvalue="3"/>
<state displaytext="Gansu" displayvalue="4"/>
</country>
</root>
Save this xml content in a file and name the file as "Country_State_List.xml"
Step-3: Adding XML as Resource File to Infopath form
Now we will add the file what we created in the Step-2 as a resource file to Infopath form. To add a resource file, Select Data -> Resourse Files as shown in the picture:
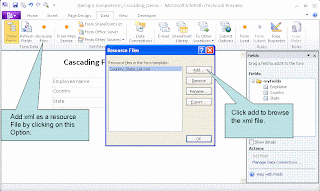
Step-4: Creating Data Source
Now we will create a new data source, in our case data source is an xml file which is available as a resource file. To add a data source, Select Data -> From Other Source -> From XML file. While selecting XML file, we have to select it from the Resource Files. Following picture shows the steps to follow:
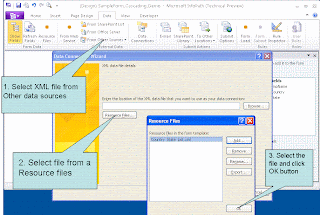
After this step, a data connection with the name is available in the form as shown below. This is just a verify the data connection.

If the new data connection is not available as show in the picture, please follow the above steps again.
Step-5: Mapping Data Source to Field Controls
Final step is to map the data source to the corresponding combobox (Country and State).
Map the Country Combobox as shown in the following image:
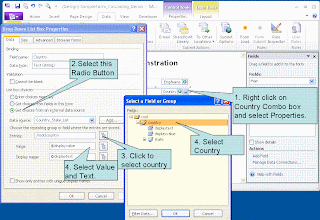
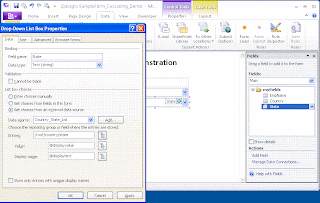
Similarly Map the State Combobox as shown in the following image:
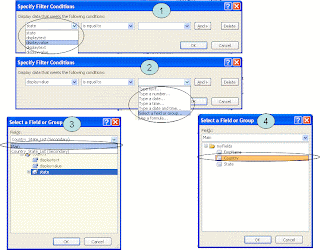
Finally we have to add the filter for the State Combobox to display only the States Associated to the select Country in the Country Combobox. Following image shows how to add the filter (with a black circle on the field):
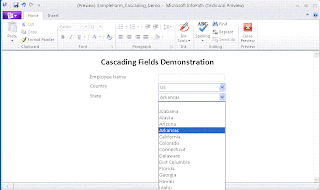
yup, we are done with the cascading dropdowns setup with a xml datasource. Now we can preview the form by selecting Home -> Preview tab. Following image shows the preview of the same:
Please note that we can use same sample for any other data source like MS-Access, SQL Server or Web Service.
4 comments:
Thank you for the post. I have recently discovered Infopath and am not a developer. Your post shows something that I can tackle without much technical knowledge. Other posts I found on the net were too technical for me. My form is rather simple where I need additional list of selectable items to show if the response is "Yes". I hope I can accomplish my task with your exmaple.
I was able to follow your post until you talk about the filters (2nd last slide). I don't know how to get to this point. I was successful in creating, adding and creating the data connection to the xml file. That was great. But I would like you to modify this discussion to show how to get to the point of applying the filters.
Just figured out how to get to the "filter" step. I used Microsoft Office help and it showed the Filter tab. It would be helpful if you could highlight that step. I have verified each country and its related states and Wow! :)
Thank you, again, for the post. I have successfully accomplished your instructions. Now, I am going back to my form to update the few fields where I need this functionality.
Asif
That's an amazing detail I have been looking for. I followed all these instructions and successfully implemented the same. Thank you for this great help.
infopath signature
Post a Comment