Recently when I am installing SharePoint 2010 Beta on one of our sandbox we faced following issue:
Microsoft.Office.Server.UserProfiles.UserProfileException: The request channel timed out while waiting for a reply after 00:00:19.9340000. Increase the timeout value passed to the call to Request or increase the SendTimeout value on the Binding. The time allotted to this operation may have been a portion of a longer timeout. ---> System.TimeoutException: The request channel timed out while waiting for a reply after 00:00:19.9340000. Increase the timeout value passed to the call to Request or increase the SendTimeout value on the Binding. The time allotted to this operation may have been a portion of a longer timeout. ---> System.TimeoutException: The HTTP request to 'https://myserver:32844/d31735f8a1b34f3a8263707181c7e298/ProfilePropertyService.svc' has exceeded the allotted timeout of 00:00:19.9990000. The time allotted to this operation may have been a portion of a longer timeout. ---> System.Net.WebException: The operation has timed out
After trying all possible approaches, following steps resolved the issue:
Step:1
Open the Channel.Config file available @
C:\Program Files\Common Files\Microsoft Shared\Web Server Extensions\14\WebClients\Profile
Step:2
Replace the "sendTimeout="00:00:20" to "sendTimeout="00:01:20"
Step:3
Reset the IIS (Option as the wizard will restart the service)
Step:4
Rerun the wizard, you can successfully complete the SharePoint 2010 installation.
Tuesday, December 8, 2009
Wednesday, November 25, 2009
Text Parsing in SQL Server
There are lots scenarios in database procedure we may required to parse the test. Most common scenario is to parse the comma separated text.
For example if we want to get the details of few employees, we will send those employee ids separated by a delimiter as a parameter to the stored procedure.
Till SQL Server 2000 we will be parsing the text character by character and then we will split according to the delimiter.
Following is the general split function which we can use in any version of SQL Server:
Function Code:
set ANSI_NULLS ON
set QUOTED_IDENTIFIER ON
go
ALTER FUNCTION [dbo].[FNSplitString]
(
-- Add the parameters for the function here
@string nvarchar(4000),
@delimiter nvarchar(10)
)
RETURNS
@StringValueTable TABLE
(
-- Add the column definitions for the TABLE variable here
Pos int IDENTITY(1,1),
StringValue nvarchar(4000)
)
AS
BEGIN
-- Fill the table variable with the rows for your result set
DECLARE @delimiterPos int
DECLARE @StringValue nvarchar(4000)
SET @string = @string + @delimiter
-- Loop thru all the characters
WHILE(LEN(@string)>0)
BEGIN
SET @delimiterPos = CHARINDEX(@delimiter,@string)
SET @StringValue = SUBSTRING(@string,0,@delimiterPos)
-- Insert the record into table variable
INSERT INTO @StringValueTable VALUES (@StringValue)
SET @string = SUBSTRING(@string,@delimiterPos+1,LEN(@string))
-- End the loop if there no more elements
IF @delimiterPos = 0
BEGIN
Break
END
END
RETURN
END
Test Sample:
SELECT * FROM [dbo].[FNSplitString]('a,bc,def,ghij,klmno,pqrstu,vw,x,yz',',')
With the new feature "CTE" in SQL Server 2005 and above we can implement the same very easily without any explicit looping mentioned in the above code.
Following is the split function using CTE:
Function Code:
set ANSI_NULLS ON
set QUOTED_IDENTIFIER ON
go
CREATE FUNCTION [dbo].[FNSplitString_New]
(
-- Add the parameters for the function here
@string nvarchar(4000),
@delimiter nvarchar(1)
)
RETURNS
@StringValueTable TABLE
(
-- Add the column definitions for the TABLE variable here
Pos int IDENTITY(1,1),
StringValue nvarchar(4000)
)
AS
BEGIN
Declare @SourceString nvarchar(MAX)
SET @SourceString = ',' + @string + ',';
-- Query using CTE
WITH CTE (Indx, Position) AS
(
SELECT CHARINDEX(@delimiter, @SourceString) Indx, 1 AS Position
UNION ALL
SELECT CHARINDEX(@delimiter, @SourceString, Indx+1) , Position + 1
FROM CTE WHERE CHARINDEX(@delimiter, @SourceString , Indx+1) <> 0
)
INSERT INTO @StringValueTable(StringValue)
SELECT SUBSTRING(@SourceString, B.Indx+1, A.Indx - B.Indx - 1) Val
FROM CTE A INNER JOIN CTE B ON A.Position = B.Position + 1
OPTION (MAXRECURSION 5000)
-- In the above query recursive option is limited to 5000
-- By default it is 100, which means we cannot loop recursively more than 100 times
RETURN
END
Test Sample:
SELECT * FROM [dbo].[FNSplitString_New]('a,bc,def,ghij,klmno,pqrstu,vw,x,yz',',')
In most of our applications we are using first approach as we are reusing from long time. Now we started taking the power of new features like CTE in our regular design and development.
We can also think about passing the 'n' parameter values to a procedure as an xml. And by using XML query capability we can get the individual values as part of the query itself.
Tuesday, November 17, 2009
SQL Server Table Variables in Transactions
Today in one of the forum I found an intersting question to execute few SQL Statments as not part of the enclosed the transaction.
Let us consider we have a following Scenario:
We have lots of statements participating in the transaction as
Begin Transaction
SQL Inerts Statement 1
Log a message in Log Table
SQL Update Statement 1
Log a message in Log Table
SQL Delete Statement 1
Commit Transaction / Rollback Transaction
In the above block if the transaction is rollbacked then we will be loosing the enteries in Log table too. But if we need the data available in the Log tables without participating in the transaction...
Now the Question is How we can acheive it...?
Immediately after see the question, most of the people thinks about using inner transaction. we have to remember that:
"Committing inner transactions is ignored by the SQL Server Database Engine. The transaction is either committed or rolled back based on the action taken at the end of the outermost transaction. If the outer transaction is committed, the inner nested transactions are also committed. If the outer transaction is rolled back, then all inner transactions are also rolled back, regardless of whether or not the inner transactions were individually committed."
So the Inner/Nested Transaction are ruled out... Now we have to think that is there any way we can get the solution...?
Yes, we can do that by using Local Table Variables. One of the importatnt behaviour of the Local Table Variable will not have any impact of the transaction. Which means irrespective of the Commit/Rollback there will not be any change in the local table variables.
Following the sample demomstrating the same:
-- Create a Sample Table to test
Create Table tblSample(col1 varchar(10))
-- declare log table variable
Declare @Tbl table(Col1 varchar(10))
--
Begin TRansaction
-- Insert Data into table variable
INSERT INTO @Tbl values ('A11')
-- Insert data into actual table
INSERT INTO tblSample
SELECT * FROM
(
Select 'A' Col1
UNION ALL
Select 'B' Col1
) T
-- Insert data into table variable
INSERT INTO @Tbl values ('B11')
rollback Transaction
--commit Transaction
SELECT * from @Tbl
SELECT * from tblSample
Run the above block once with rollback and second time with commit transaction, you will find the same data in the log table @tbl.
Hope this provides some additonal info on local table variables and how we can use in these scenarios.
Monday, September 7, 2009
FusionCharts Free are completely free and open source
We can use FusionCharts Free for displaying any graphical info from SharePoint as explained in the previous posts.
Now FusionCharts Free are completely free and open-source with source code.
Please have a look into it:
FusionCharts
Now FusionCharts Free are completely free and open-source with source code.
Please have a look into it:
FusionCharts
Tuesday, August 18, 2009
XML DML INSERT operation in SQL Server
Recently in one of our project the requirement is to insert element within existing XML which is a column(XML Data type) in a table. In other words we have to insert dynamic xml in another xml. I hear the similar requirement in most of the forums...
We can use one of the XML DML operation "INSERT" - Inserts one or more nodes identified by Expression1 as child nodes or siblings of the node identified by Expression2.
Using this Insert operation we can insert only a static nodes as shown below:
-- Declare Local Variables
DECLARE @MainXML XML
DECLARE @NewXML XML
-- Sample XML with employee information
SET @MainXML = '<employees>
<employee>
<fname>John</fname>
<lname>V</lname>
<desig>SSE</desig>
</employee>
<employee>
<fname>Pascal</fname>
<lname>J</lname>
<desig>SE</desig>
</employee>
<employee>
<fname>Naveen</fname>
<lname>M</lname>
<desig>Engineer</desig>
</employee>
</employees>'
-- Inserting static xml
SET @MainXML.modify('insert (<employee><fname>Test</fname></employee>) as last into (/employees)[1]')
-- To verify the reault
select @MainXML
Now if we want to insert an XML which is available within the local variable @NewXML:
-- Assigning the sample xml to the local variable
SET @NewXML = '<employee><fname>Test</fname></employee>'
Now if we try to insert this xml from the local variable using sql:variable:
SET @MainXML.modify(' insert {sql:variable("@NewXML")} as last into (/employees)[1]')
We will get an error message indicating:
XQuery [modify()]: An expression was expected
In SQL Server 2005 the work around will be:
1. Dynamic Query
2. Combination of the XML DML Operations
Here I am not concentrating on the Dynamic Query approach as it is pretty simple to implement and it may not be a best approach when compared to other.
Following set of queries using DML operation, we can insert XML data from a local variable:
-- Appending both the Main XML and New XML to insert into Main XML with a root node
SET @MainXML = '<root>' + CAST(@MainXML AS VARCHAR(MAX)) + '<new>' + CAST(@NewXML AS VARCHAR(MAX)) + '</new>' + '</root>'
-- Moving employee element from new element to main xml as part of employees element
SET @MainXML.modify(' insert (//new/employee) as last into (/employees)[1]')
-- Deleting the new element
SET @MainXML.modify(' delete (//new)')
-- Steps to move employee element to the end and to delete the root element
SET @MainXML.modify(' insert (//root/employees) after (/root)[1] ')
SET @MainXML.modify(' delete (/root)')
-- Selecting the xml for final verification
SELECT @MainXML
In Summary following is the sample Script in SQL Server 2005 to insert a dynamic XML into another XML:
DECLARE @MainXML XML
DECLARE @NewXML XML
SET @MainXML = '<employees>
<employee>
<fname>John</fname>
<lname>V</lname>
<desig>SSE</desig>
</employee>
<employee>
<fname>Pascal</fname>
<lname>J</lname>
<desig>SE</desig>
</employee>
<employee>
<fname>Naveen</fname>
<lname>M</lname>
<desig>Engineer</desig>
</employee>
</employees>'
SET @NewXML = '<employee><fname>Test</fname></employee>'
SET @MainXML = '<root>' + CAST(@MainXML AS VARCHAR(MAX)) + '<new>' + CAST(@NewXML AS VARCHAR(MAX)) + '</new>' + '</root>'
SET @MainXML.modify(' insert (//new/employee) as last into (/employees)[1]')
SET @MainXML.modify(' delete (//new)')
SET @MainXML.modify(' insert (//root/employees) after (/root)[1] ')
SET @MainXML.modify(' delete (/root)')
SELECT @MainXML
These many steps are not required for SQL Server 2008 as it supports to insert the dynamic XML directly into another XML. Following is the sample script for SQL Server 2008:
DECLARE @MainXML XML
DECLARE @NewXML XML
SET @MainXML = '<employees>
<employee>
<fname>John</fname>
<lname>V</lname>
<desig>SSE</desig>
</employee>
<employee>
<fname>Pascal</fname>
<lname>J</lname>
<desig>SE</desig>
</employee>
<employee>
<fname>Naveen</fname>
<lname>M</lname>
<desig>Engineer</desig>
</employee>
</employees>'
SET @NewXML = '<employee><fname>Test</fname></employee>'
-- One statement in SQL Server 2008 to do all the operation what we mentioned above for SQL Server 2005
SET @MainXML.modify(' insert {sql:variable("@NewXML")} as last into (/employees)[1]')
select @MainXML
This we implemented in most of our applications, hope it will be useful to most of the folks...
Labels:
SQL Server 2005,
SQL Server 2008,
XML
Thursday, August 13, 2009
An Introduction to Infopath 2010 - Part-3 - Creating Cascading Dropdowns
In continuation to my previous posts
An Introduction to Infopath 2010 - Part-1 - An Overview
An Introduction to Infopath 2010 - Part-2 - Creating Basic Forms
In this post we will see how easily we can create Cascading Dropdown controls in Infopath 2010 Desinger tool.
Most of the times in our applications Cascading Dropdown (When there is change event for one of the combo box should reflect the values in another combo box. For example when we change the Country in the country Combobox, then the states should reflect in the State Combobox for the selected country) is a common requirement. Right now in SharePoint we are achieving this requirement by using JavaScript or a JQuery.
Infopath 2010 made our job more easy by providing this functionality out-of-the-box. Now we will see a sample for creating a form to demonstrate the Cascading Dropdown functionality.
Step-1: Creating a Sample Form
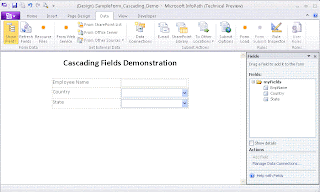
Create a sample form as shown in the following picture with two dropdown list controls for Country and State.
Step-2: Creating an XML file
For this example we are considering xml as a data source. Following is the xml format for storing the Country and State data:
<?xml version="1.0" encoding="UTF-8"?>
<root>
<country displaytext="India" displayvalue="India">
<state displaytext="Karnataka" displayvalue="Karnataka"/>
<state displaytext="Andhra" displayvalue="AP"/>
<state displaytext="Maharastra" displayvalue="Mumbai"/>
</country>
<country displaytext="US" displayvalue="US">
<state displaytext="Alabama" displayvalue="1"/>
<state displaytext="Alaska" displayvalue="2"/>
<state displaytext="Arizona" displayvalue="3"/>
<state displaytext="Arkansas" displayvalue="4"/>
<state displaytext="California" displayvalue="5"/>
<state displaytext="Colorado" displayvalue="6"/>
<state displaytext="Connecticut" displayvalue="7"/>
<state displaytext="Delaware" displayvalue="8"/>
<state displaytext="Dist Columbia" displayvalue="9"/>
<state displaytext="Florida" displayvalue="10"/>
<state displaytext="Georgia" displayvalue="11"/>
<state displaytext="Hawaii" displayvalue="12"/>
<state displaytext="Idaho" displayvalue="13"/>
</country>
<country displaytext="China" displayvalue="China">
<state displaytext="Anhui" displayvalue="1"/>
<state displaytext="Beijing" displayvalue="2"/>
<state displaytext="Fujian" displayvalue="3"/>
<state displaytext="Gansu" displayvalue="4"/>
</country>
</root>
Save this xml content in a file and name the file as "Country_State_List.xml"
Step-3: Adding XML as Resource File to Infopath form
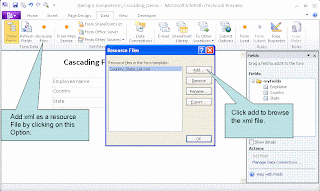
Now we will add the file what we created in the Step-2 as a resource file to Infopath form. To add a resource file, Select Data -> Resourse Files as shown in the picture:
Step-4: Creating Data Source
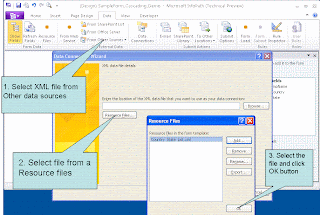
Now we will create a new data source, in our case data source is an xml file which is available as a resource file. To add a data source, Select Data -> From Other Source -> From XML file. While selecting XML file, we have to select it from the Resource Files. Following picture shows the steps to follow:
After this step, a data connection with the name is available in the form as shown below. This is just a verify the data connection.

If the new data connection is not available as show in the picture, please follow the above steps again.
Step-5: Mapping Data Source to Field Controls
Final step is to map the data source to the corresponding combobox (Country and State).
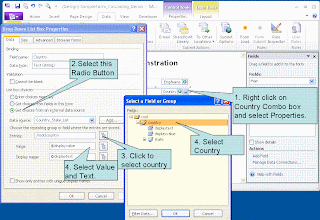
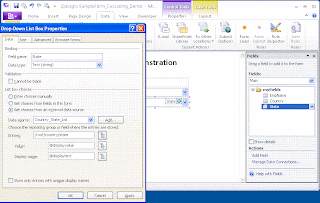
Map the Country Combobox as shown in the following image:
Similarly Map the State Combobox as shown in the following image:
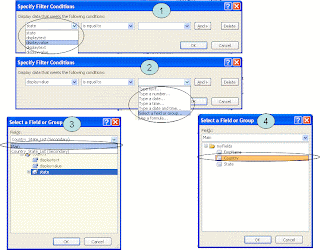
Finally we have to add the filter for the State Combobox to display only the States Associated to the select Country in the Country Combobox. Following image shows how to add the filter (with a black circle on the field):
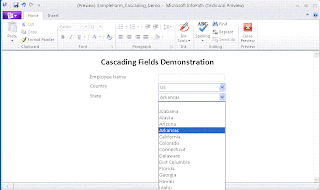
yup, we are done with the cascading dropdowns setup with a xml datasource. Now we can preview the form by selecting Home -> Preview tab. Following image shows the preview of the same:
Please note that we can use same sample for any other data source like MS-Access, SQL Server or Web Service.
An Introduction to Infopath 2010 - Part-1 - An Overview
An Introduction to Infopath 2010 - Part-2 - Creating Basic Forms
In this post we will see how easily we can create Cascading Dropdown controls in Infopath 2010 Desinger tool.
Most of the times in our applications Cascading Dropdown (When there is change event for one of the combo box should reflect the values in another combo box. For example when we change the Country in the country Combobox, then the states should reflect in the State Combobox for the selected country) is a common requirement. Right now in SharePoint we are achieving this requirement by using JavaScript or a JQuery.
Infopath 2010 made our job more easy by providing this functionality out-of-the-box. Now we will see a sample for creating a form to demonstrate the Cascading Dropdown functionality.
Step-1: Creating a Sample Form
Create a sample form as shown in the following picture with two dropdown list controls for Country and State.

Step-2: Creating an XML file
For this example we are considering xml as a data source. Following is the xml format for storing the Country and State data:
<?xml version="1.0" encoding="UTF-8"?>
<root>
<country displaytext="India" displayvalue="India">
<state displaytext="Karnataka" displayvalue="Karnataka"/>
<state displaytext="Andhra" displayvalue="AP"/>
<state displaytext="Maharastra" displayvalue="Mumbai"/>
</country>
<country displaytext="US" displayvalue="US">
<state displaytext="Alabama" displayvalue="1"/>
<state displaytext="Alaska" displayvalue="2"/>
<state displaytext="Arizona" displayvalue="3"/>
<state displaytext="Arkansas" displayvalue="4"/>
<state displaytext="California" displayvalue="5"/>
<state displaytext="Colorado" displayvalue="6"/>
<state displaytext="Connecticut" displayvalue="7"/>
<state displaytext="Delaware" displayvalue="8"/>
<state displaytext="Dist Columbia" displayvalue="9"/>
<state displaytext="Florida" displayvalue="10"/>
<state displaytext="Georgia" displayvalue="11"/>
<state displaytext="Hawaii" displayvalue="12"/>
<state displaytext="Idaho" displayvalue="13"/>
</country>
<country displaytext="China" displayvalue="China">
<state displaytext="Anhui" displayvalue="1"/>
<state displaytext="Beijing" displayvalue="2"/>
<state displaytext="Fujian" displayvalue="3"/>
<state displaytext="Gansu" displayvalue="4"/>
</country>
</root>
Save this xml content in a file and name the file as "Country_State_List.xml"
Step-3: Adding XML as Resource File to Infopath form
Now we will add the file what we created in the Step-2 as a resource file to Infopath form. To add a resource file, Select Data -> Resourse Files as shown in the picture:

Step-4: Creating Data Source
Now we will create a new data source, in our case data source is an xml file which is available as a resource file. To add a data source, Select Data -> From Other Source -> From XML file. While selecting XML file, we have to select it from the Resource Files. Following picture shows the steps to follow:

After this step, a data connection with the name is available in the form as shown below. This is just a verify the data connection.

If the new data connection is not available as show in the picture, please follow the above steps again.
Step-5: Mapping Data Source to Field Controls
Final step is to map the data source to the corresponding combobox (Country and State).
Map the Country Combobox as shown in the following image:

Similarly Map the State Combobox as shown in the following image:

Finally we have to add the filter for the State Combobox to display only the States Associated to the select Country in the Country Combobox. Following image shows how to add the filter (with a black circle on the field):

yup, we are done with the cascading dropdowns setup with a xml datasource. Now we can preview the form by selecting Home -> Preview tab. Following image shows the preview of the same:

Please note that we can use same sample for any other data source like MS-Access, SQL Server or Web Service.
Wednesday, August 12, 2009
An Introduction to Infopath 2010 - Part-2
In continuation to the previous post - An Introduction to Infopath 2010 - Part-1, this post explains on how we can create/design a basic forms using InfoPath 2010.
To design an InfoPath form we will be using InfoPath Designer 2010.

Designer comes with a set of predefined templates for easy-to designing the forms. All these templates are grouped into different buckets like Popular Form Templates, Advanced Form Templates, InfoPath 2007 Form Templates, Template Parts.
Following screen shot shows the set of templates available in the designer:

This window in the office terms is called as Office Out Space, which allows us to open an existing forms, close the form or even to print a form. All the office 2010 applications contains Out Space to perform these operations with an additional tab for setting the options within that application (which can be Infopath/Excel/Word/PowerPoint etc).
Following table provides the set of templates available with the designer with the brief description about their usage:
Popular Form Templates
SharePoint List
Template used to view and edit items in the existing SharePoint List.
SharePoint Document Library
Template to collect and save the data in a SharePoint Document Library.
Blank
A Blank template for designing the form. It can be used for the browser enabled forms.
E-mail
Teamplate for designing the email submitted forms.
Blank (InfoPath Editor)
A Blank template for designing the form and it can be used only with the InfoPath editor while submiting the form.
Advanced Form Templates
Database
Template to design a form to collect data from databases like MS-Access, SQL Server.
Web Service
Template to design a form for query data from a Web Service and even to submit to a Web Service.
XML or Schema
Template to design a form based on an xml file or an a schema file.
Data Connection File
Template to design a form to query a SharePoint Data Source which is defined in a Data Connection File.
Convert Word or Excel Form
Template to design a form based on Microsoft Word document or Microsoft Excel.
Document Information Panel
Form used to edit the properties of the documents stored in a Document Library.
InfoPath 2007 Form Templates
These templates are for the InfoPath 2007.
Blank
A Blank template for designing the form. It can be used for the browser enabled forms.
Blank (InfoPath Editor)
A Blank template for designing the form and it can be used only with the InfoPath editor while submiting the form.
Template Parts
These templates are used to design a template part that can be reused in multiple forms.
Blank
XML or Schema
We will start with the Blank Template from the Popular Form Templates category to create a simple form.

In the coming posts we will see how we can add the validation rules and different submit options to the form.
To design an InfoPath form we will be using InfoPath Designer 2010.

Designer comes with a set of predefined templates for easy-to designing the forms. All these templates are grouped into different buckets like Popular Form Templates, Advanced Form Templates, InfoPath 2007 Form Templates, Template Parts.
Following screen shot shows the set of templates available in the designer:

This window in the office terms is called as Office Out Space, which allows us to open an existing forms, close the form or even to print a form. All the office 2010 applications contains Out Space to perform these operations with an additional tab for setting the options within that application (which can be Infopath/Excel/Word/PowerPoint etc).
Following table provides the set of templates available with the designer with the brief description about their usage:
Popular Form Templates
Template used to view and edit items in the existing SharePoint List.
Template to collect and save the data in a SharePoint Document Library.
A Blank template for designing the form. It can be used for the browser enabled forms.
Teamplate for designing the email submitted forms.
A Blank template for designing the form and it can be used only with the InfoPath editor while submiting the form.
Advanced Form Templates
Template to design a form to collect data from databases like MS-Access, SQL Server.
Template to design a form for query data from a Web Service and even to submit to a Web Service.
Template to design a form based on an xml file or an a schema file.
Template to design a form to query a SharePoint Data Source which is defined in a Data Connection File.
Template to design a form based on Microsoft Word document or Microsoft Excel.
Form used to edit the properties of the documents stored in a Document Library.
InfoPath 2007 Form Templates
These templates are for the InfoPath 2007.
A Blank template for designing the form. It can be used for the browser enabled forms.
A Blank template for designing the form and it can be used only with the InfoPath editor while submiting the form.
Template Parts
These templates are used to design a template part that can be reused in multiple forms.
We will start with the Blank Template from the Popular Form Templates category to create a simple form.

In the coming posts we will see how we can add the validation rules and different submit options to the form.
Tuesday, August 11, 2009
An Introduction to Infopath 2010 - Part-I
I will be posting set of articles covering the features of Infopath 2010 and how it is different from Infopath 2007 which is completely based on the Technical Preview release.
In this post I will be providing a quick overview on InfoPath 2010.
InfoPath 2010 makes our job easier for designing any electronic forms without writing any code by using easy-to-use tools provided out-of-the-box. It also includes the Office UI (Ribbons) for easy access of the controls while designing the forms - an autstanding UI. With a few clicks users can customize SharePoint list forms, add custom layouts and rules to validate the data.
In this version, InfoPath comes with two flavours within the single installation:
1. InfoPath Designer 2010
Designer 2010 comes with a Good User Interface specifically for the designers to design the forms with easy-to-use tools.
Following image shows the Form designed in InfoPath Designer 2010:
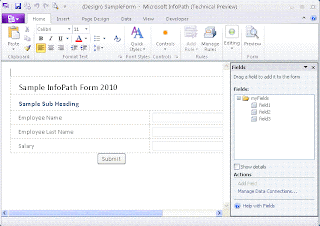
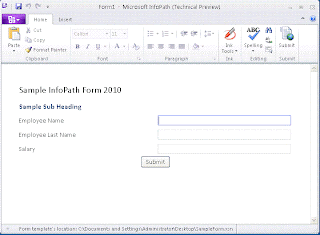
2. InfoPath Editor 2010
Editor 2010 comes with a Fluent UI with much improved, simpler user experience for filling out forms.
Following image shows the Form opened in InfoPath Editor 2010:
This is not same case with InfoPath 2007, where we will be doing both the activities in the single tool.
We can consider InfoPath forms for most of the simple form based applications. We can even think about associating an InfoPath form to a SharePoint List.
Please stay tuned to know more about my experiences with InfoPath 2010...
In this post I will be providing a quick overview on InfoPath 2010.
InfoPath 2010 makes our job easier for designing any electronic forms without writing any code by using easy-to-use tools provided out-of-the-box. It also includes the Office UI (Ribbons) for easy access of the controls while designing the forms - an autstanding UI. With a few clicks users can customize SharePoint list forms, add custom layouts and rules to validate the data.
In this version, InfoPath comes with two flavours within the single installation:
1. InfoPath Designer 2010
Designer 2010 comes with a Good User Interface specifically for the designers to design the forms with easy-to-use tools.
Following image shows the Form designed in InfoPath Designer 2010:

2. InfoPath Editor 2010
Editor 2010 comes with a Fluent UI with much improved, simpler user experience for filling out forms.
Following image shows the Form opened in InfoPath Editor 2010:

This is not same case with InfoPath 2007, where we will be doing both the activities in the single tool.
We can consider InfoPath forms for most of the simple form based applications. We can even think about associating an InfoPath form to a SharePoint List.
Please stay tuned to know more about my experiences with InfoPath 2010...
Monday, August 10, 2009
SharePoint Designer 2010 (Technical Preview) Installation Issue
Recently I tried to install SharePoint Designer 2010 to get the early working experience and new features of the product when compared to SPD 2007.
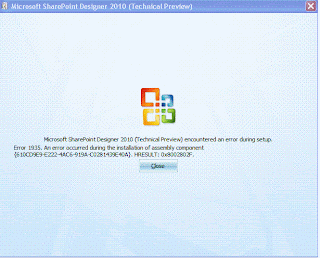
When I am Install SPD 2010 on one of our XP machine, I am getting the following error:
I am still looking on how to fix this issue, if I get any solution I will post it here...
When I am Install SPD 2010 on one of our XP machine, I am getting the following error:

I am still looking on how to fix this issue, if I get any solution I will post it here...
Office Professional 2010 (Technical Preview) Installation Error
Recently I received an invitation from Microsoft to Participate in the Technical Preview Program. As part of this I downloaded Office 2010 Professional Edition.
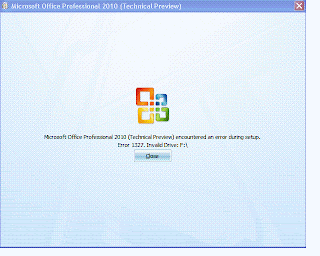
When I tried to upgrade my Office 2003 in one of our XP machine I got the following error message:
"Microsoft Office Professional 2010(TEchnical Preview) encountered an error during setup. Error 1327. Invalid Drive F:\"
Though there was an error during the setup, luckily Office 2010 got installed.
I feel that the error occured while upgrading the office 2003 to 2007, because of that I have both the softwares on machine.
I hope this will be fixed in the actual version of the Office 2010...
I even tried upgrading Infopath 2010 and got the similar error as shown in the following images.

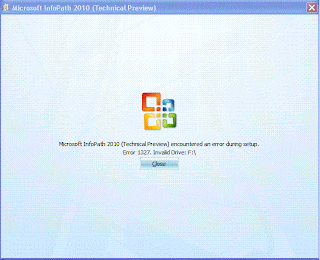
Here also Infopath installed successfully though there was an error during installation/setup.
When I tried to upgrade my Office 2003 in one of our XP machine I got the following error message:
"Microsoft Office Professional 2010(TEchnical Preview) encountered an error during setup. Error 1327. Invalid Drive F:\"

Though there was an error during the setup, luckily Office 2010 got installed.
I feel that the error occured while upgrading the office 2003 to 2007, because of that I have both the softwares on machine.
I hope this will be fixed in the actual version of the Office 2010...
I even tried upgrading Infopath 2010 and got the similar error as shown in the following images.


Here also Infopath installed successfully though there was an error during installation/setup.
Tuesday, August 4, 2009
JQuery to Build Fusion Charts for SharePoint List
This is very much similar to my earlier post "Fusion Charts for SharePoint List" where we used JavaScript for extracting the data from SharePoint List.
Here I will be explaining the similar concept using JQuery. As everyone aware that JQuery is getting very famous and even Microsoft announced that JQuery will be available as part of the Visual Studio 2010 with intellisence too.
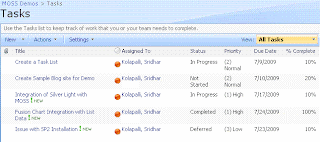
Most of the times our customers expect to develop the charts with no time for preparing lots of dashboards or metrics. Lets consider that we have a Task List with all the tasks assigned to different users and are at the different status like:
1. Not Started
2. In Progress
3. Completed
4. Deferred
5. Waiting for someone else
At this point of time we may get lots of request for building the charts for this list data. I will be concentrating on generating the Pie Chart for Different Status available in this Task List, to identify how many tasks are there at different statuses. Following is the sample image showing the List Data:
Following are the steps to implement the fusion charts:
1. Download Fusion Charts and upload to a document library. In this case I created a separate document library called FusionCharts where all the fusion charts are uploaded.
2. Come up with the RPC Protocol URL for extracting the data from the task list.
In our case following is the URL:
http://localhost/sites/MOSSDemos/_vti_bin/owssvr.dll?Cmd=Display&Query=Status&List=%7B7C6C7072%2D12B5%2D4B05%2D90A4%2D052160CC8F74%7D&XMLDATA=TRUE
Note that we are extracting only the Status field from the Task List.
And the List id is the Task List Guiid within the SharePoint Site.
3. Download JQuery script from the site and upload to the Shared Documents.
4. Copy the following javascript which uses JQuery Script into the content editor web part:
<!-- JScript from shared documents -->
<script type="text/javascript" src="/Shared Documents/jquery-1.3.2.min.js"></script>
<!-- Div tag for appending the graph -->
<div id="divGraph"></div>
<script type="text/javascript">
// Declare all local variables
var iNotStarted = 0;
var iInProgress = 0;
var iCompleted = 0;
var iDeferred = 0;
var iWaitingonsomeoneelse = 0;
var sObjectData = "";
// Call the function once the document is loaded
$(document).ready(function() {
var sSiteUrl = "http://localhost/sites/MOSSDemos/_vti_bin/owssvr.dll?";
// This Parameter Contains List Id too
var sCmdParameters = "Cmd=Display&Query=Status&List=%7B7C6C7072%2D12B5%2D4B05%2D90A4%2D052160CC8F74%7D&XMLDATA=TRUE"
// Ajax call using a JavaScript
$.ajax({
url: sSiteUrl + sCmdParameters,
type: "GET",
dataType: "xml",
data: "",
complete: processResult,
contentType: "text/xml; charset=\"utf-8\""
});
});
function processResult(xData, status) {
//alert(xData.responseXML.xml);
var NS = '#RowsetSchema'
$(xData.responseXML).children(1).children(1).children().each(function() {
var Status = $(this).attr("ows_Status");
switch (Status) {
case "Not Started":
iNotStarted = iNotStarted + 1; break;
case "In Progress":
iInProgress = iInProgress + 1; break;
case "Completed":
iCompleted = iCompleted + 1; break;
case "Deferred":
iDeferred = iDeferred + 1; break;
case "Waiting on someone else":
iWaitingonsomeoneelse = iWaitingonsomeoneelse + 1; break;
default:
break;
}
});
// Create the Object for the Fusion Chart
// Opening Object Tag
sObjectData = "<object classid=\"clsid:D27CDB6E-AE6D-11cf-96B8-444553540000\" ";
sObjectData += "codebase=\"http://download.macromedia.com/pub/shockwave/cabs/flash/swflash.cab#version=6,0,0,0\" ";
sObjectData += "width=\"400\" ";
sObjectData += "height=\"300\" ";
sObjectData += "id=\"Pie3D\"> ";
// Setting Parameters
sObjectData += "<param name=\"movie\" value=\"http://localhost/sites/MOSSDemos/FusionCharts/FusionCharts/FCF_Pie3D.swf?chartWidth=400&chartHeight=300\"> ";
sObjectData += "<param name=\"FlashVars\" value=\"&dataXML=<graph caption='Tasks By Status Percentage' ";
sObjectData += "xAxisName='Site' yAxisName='Qty by Site' showNames='1' decimalPrecision='1' showPercentageInLabel='1' formatNumberScale='0' ";
sObjectData += "pieYScale='70' pieBorderAlpha='40' pieFillAlpha='80' pieSliceDepth='15'> ";
sObjectData += "<set name='Not Started' value='" + iNotStarted + "' color='#660033' link='' /> ";
sObjectData += "<set name='Completed' value='" + iInProgress + "' color='#3399ff' link='' /> ";
sObjectData += "<set name='In Progress' value='" + iCompleted + "' color='#99cc99' link='' /> ";
sObjectData += "<set name='Deferred' value='" + iDeferred + "' color='#00ff99' link='' /> ";
sObjectData += "<set name='Waiting for someone else' value='" + iWaitingonsomeoneelse + "' color='#000033' link='' /> ";
sObjectData += "</graph>\"> ";
sObjectData += "<param name=\"quality\" value=\"high\"> ";
sObjectData += "</object> ";
$("#divGraph").append(sObjectData);
}
</script>
Following are the lines to be changed in the script:
A. Location of the FCF_Pie3D.swf file within the "object" tag.
B. Site Url in the variable "sSiteUrl".
C. Task List Id in the variable "sCmdParameters".
D. Path of the JScript (Assumed it is available in the Shared Documents)
With this, A Pie chart representations the Task Data within the SharePoint List as shown below:

Here I will be explaining the similar concept using JQuery. As everyone aware that JQuery is getting very famous and even Microsoft announced that JQuery will be available as part of the Visual Studio 2010 with intellisence too.
Most of the times our customers expect to develop the charts with no time for preparing lots of dashboards or metrics. Lets consider that we have a Task List with all the tasks assigned to different users and are at the different status like:
1. Not Started
2. In Progress
3. Completed
4. Deferred
5. Waiting for someone else
At this point of time we may get lots of request for building the charts for this list data. I will be concentrating on generating the Pie Chart for Different Status available in this Task List, to identify how many tasks are there at different statuses. Following is the sample image showing the List Data:

Following are the steps to implement the fusion charts:
1. Download Fusion Charts and upload to a document library. In this case I created a separate document library called FusionCharts where all the fusion charts are uploaded.
2. Come up with the RPC Protocol URL for extracting the data from the task list.
In our case following is the URL:
http://localhost/sites/MOSSDemos/_vti_bin/owssvr.dll?Cmd=Display&Query=Status&List=%7B7C6C7072%2D12B5%2D4B05%2D90A4%2D052160CC8F74%7D&XMLDATA=TRUE
Note that we are extracting only the Status field from the Task List.
And the List id is the Task List Guiid within the SharePoint Site.
3. Download JQuery script from the site and upload to the Shared Documents.
4. Copy the following javascript which uses JQuery Script into the content editor web part:
<!-- JScript from shared documents -->
<script type="text/javascript" src="/Shared Documents/jquery-1.3.2.min.js"></script>
<!-- Div tag for appending the graph -->
<div id="divGraph"></div>
<script type="text/javascript">
// Declare all local variables
var iNotStarted = 0;
var iInProgress = 0;
var iCompleted = 0;
var iDeferred = 0;
var iWaitingonsomeoneelse = 0;
var sObjectData = "";
// Call the function once the document is loaded
$(document).ready(function() {
var sSiteUrl = "http://localhost/sites/MOSSDemos/_vti_bin/owssvr.dll?";
// This Parameter Contains List Id too
var sCmdParameters = "Cmd=Display&Query=Status&List=%7B7C6C7072%2D12B5%2D4B05%2D90A4%2D052160CC8F74%7D&XMLDATA=TRUE"
// Ajax call using a JavaScript
$.ajax({
url: sSiteUrl + sCmdParameters,
type: "GET",
dataType: "xml",
data: "",
complete: processResult,
contentType: "text/xml; charset=\"utf-8\""
});
});
function processResult(xData, status) {
//alert(xData.responseXML.xml);
var NS = '#RowsetSchema'
$(xData.responseXML).children(1).children(1).children().each(function() {
var Status = $(this).attr("ows_Status");
switch (Status) {
case "Not Started":
iNotStarted = iNotStarted + 1; break;
case "In Progress":
iInProgress = iInProgress + 1; break;
case "Completed":
iCompleted = iCompleted + 1; break;
case "Deferred":
iDeferred = iDeferred + 1; break;
case "Waiting on someone else":
iWaitingonsomeoneelse = iWaitingonsomeoneelse + 1; break;
default:
break;
}
});
// Create the Object for the Fusion Chart
// Opening Object Tag
sObjectData = "<object classid=\"clsid:D27CDB6E-AE6D-11cf-96B8-444553540000\" ";
sObjectData += "codebase=\"http://download.macromedia.com/pub/shockwave/cabs/flash/swflash.cab#version=6,0,0,0\" ";
sObjectData += "width=\"400\" ";
sObjectData += "height=\"300\" ";
sObjectData += "id=\"Pie3D\"> ";
// Setting Parameters
sObjectData += "<param name=\"movie\" value=\"http://localhost/sites/MOSSDemos/FusionCharts/FusionCharts/FCF_Pie3D.swf?chartWidth=400&chartHeight=300\"> ";
sObjectData += "<param name=\"FlashVars\" value=\"&dataXML=<graph caption='Tasks By Status Percentage' ";
sObjectData += "xAxisName='Site' yAxisName='Qty by Site' showNames='1' decimalPrecision='1' showPercentageInLabel='1' formatNumberScale='0' ";
sObjectData += "pieYScale='70' pieBorderAlpha='40' pieFillAlpha='80' pieSliceDepth='15'> ";
sObjectData += "<set name='Not Started' value='" + iNotStarted + "' color='#660033' link='' /> ";
sObjectData += "<set name='Completed' value='" + iInProgress + "' color='#3399ff' link='' /> ";
sObjectData += "<set name='In Progress' value='" + iCompleted + "' color='#99cc99' link='' /> ";
sObjectData += "<set name='Deferred' value='" + iDeferred + "' color='#00ff99' link='' /> ";
sObjectData += "<set name='Waiting for someone else' value='" + iWaitingonsomeoneelse + "' color='#000033' link='' /> ";
sObjectData += "</graph>\"> ";
sObjectData += "<param name=\"quality\" value=\"high\"> ";
sObjectData += "</object> ";
$("#divGraph").append(sObjectData);
}
</script>
Following are the lines to be changed in the script:
A. Location of the FCF_Pie3D.swf file within the "object" tag.
B. Site Url in the variable "sSiteUrl".
C. Task List Id in the variable "sCmdParameters".
D. Path of the JScript (Assumed it is available in the Shared Documents)
With this, A Pie chart representations the Task Data within the SharePoint List as shown below:

Labels:
Fusion Charts,
JQuery,
MOSS 2007,
WSS 3.0
Thursday, July 30, 2009
SQL Server Database Backups using SMO in C#
In the previous post we looked at the What is SMO and where we can use SMO. Now we will see how we can use SMO for taking SQL Server Database backups in C# code.
The first step in our code is to estblish the connection to the database. In our regular .net applications we will use SqlConnection for connecting to the database server. In SMO APIs we will be using the class called "Server" as shown below:
Microsoft.SqlServer.Management.Smo.Server objSrv = new Server("Database Server Name");
if we are planning to connect to any particular instance, we can even pass the instance name as part of the database server name as:
Microsoft.SqlServer.Management.Smo.Server objSrv = new Server("Database Server Name\\Instance Name");
With this line we will be establishing the connectivity to the database server. To get any information about the server, we can use this object. For example to get the SQL Server edition like Enterprise/Standard/Developer edition, we can use Information property within the Server object as shown below:
String sEdition = objSrv.Information.Edition;
Using this Information class we can get lots of information about the SQL Server like OSVersion, Collation, CaseSensitive, Clustered, Physical Memory and Version etc.
Next step for us is to create the instance of the Backup class which is core part for taking the backup of the database:
Microsoft.SqlServer.Management.Smo.Backup objBkpUp = new Backup();
There is should some option to provide details like Database Name, Backup Options (Database/Log File/Data File). The option is nothing but the Backup class as shown below:
objBkpUp.Action = BackupActionType.Database;
objBkpUp.Database = "MyDataBase";
objBkpUp.MediaName = "FileSystem";
And also we have to provide the info about the Device (File/Tape/Pipe) for taking the backup. For this we will be using the BackupDeviceItem class.
BackupDeviceItem objBkpDeviceItem = new BackupDeviceItem();
objBkpDeviceItem.DeviceType = DeviceType.File;
objBkpDeviceItem.Name = "C:\\filename.bak";
Once device is created we have to add it to the Backup instance as:
objBkpUp.Devices.Add(objBkpDeviceItem);
Finally we are ready to initiate a call for the backup operation by passing the Server instance:
objBkpUp.Initialize = true;
objBkpUp.SqlBackup(objSrv);
Here is the complete code:
Microsoft.SqlServer.Management.Smo.Backup objBkpUp = new Backup();
Microsoft.SqlServer.Management.Smo.Server objSrv = new Server("DBName");
Console.WriteLine("Server Edition: " + objSrv.Information.Edition);
objBkpUp.Action = BackupActionType.Database;
objBkpUp.Database = "MyDataBase";
objBkpUp.MediaName = "FileSystem";
BackupDeviceItem objBkpDeviceItem = new BackupDeviceItem();
objBkpDeviceItem.DeviceType = DeviceType.File;
objBkpDeviceItem.Name = "h:\\zzTest.bak";
objBkpUp.Devices.Add(objBkpDeviceItem);
objBkpUp.Initialize = true;
objBkpUp.SqlBackup(objSrv);
Please note that we have to add the following assembly references:
Microsoft.SqlServer.Smo
Microsoft.SqlServer.ConnectionInfo
and in the code we have to refer following namespace:
using Microsoft.SqlServer.Management.Smo;
Wednesday, July 29, 2009
What is SMO?
Are we wondering what is this SMO...?
Recently one of our team member asked me a question on who we can write a C# code for taking a SQL Server Database Bakup without using "Backup Database" sql command which made me to write this post.
SMO is Sql Server Management Objects providing a set of APIs for managing SQL Server.
In a short note:
"It is a collection of objects that are designed for programming all the aspects of Managing the Microsoft SQL Server"
And also we can say that SMO is a replacement of SQL-DMO(SQL Server Distributed Management Objects). SMO design goal is to mainly improve Scalability and Performance when compared to the SQL-DMO which is available with SQL Server 2000. SMO is relaced with SQL Server 2005 and even it supports SQL Server 2000 as well.
We can use SMO to perform any of the following administrative operations on the SQL Server:
Create databases
Perform backups
Create jobs
Configure SQL Server
Assign permissions
and to perform many other administrative tasks.
Following are the set of Assemblies available for the programming:
Microsoft.SqlServer.management
Microsoft.SqlServer.Management.NotificationServices
Microsoft.SqlServer.Management.Smo
Microsoft.SqlServer.Management.Smo.Agent
Microsoft.SqlServer.Management.Smo.Broker
Microsoft.SqlServer.Management.Smo.Mail
Microsoft.SqlServer.Management.Smo.RegisteredServers
Microsoft.SqlServer.Management.Smo.Wmi
Microsoft.SqlServer.Management.Trace namespaces
In the comming post I will explain few set of Objects and how can we write simple program in C# to backup a particular database using SMO APIs.
Recently one of our team member asked me a question on who we can write a C# code for taking a SQL Server Database Bakup without using "Backup Database" sql command which made me to write this post.
SMO is Sql Server Management Objects providing a set of APIs for managing SQL Server.
In a short note:
"It is a collection of objects that are designed for programming all the aspects of Managing the Microsoft SQL Server"
And also we can say that SMO is a replacement of SQL-DMO(SQL Server Distributed Management Objects). SMO design goal is to mainly improve Scalability and Performance when compared to the SQL-DMO which is available with SQL Server 2000. SMO is relaced with SQL Server 2005 and even it supports SQL Server 2000 as well.
We can use SMO to perform any of the following administrative operations on the SQL Server:
and to perform many other administrative tasks.
Following are the set of Assemblies available for the programming:
In the comming post I will explain few set of Objects and how can we write simple program in C# to backup a particular database using SMO APIs.
Monday, July 27, 2009
How to get deep nested elements in SQL Queries using FOR XML PATH
Recently in one of the forums I came across this question.
How can we have deep nested elements in the xml when we are using FOR XML PATH in a SQL Query.
For example the following query
SELECT 'value' AS 'orderdatabase/allorders/customer/information/orderaddress/shippingaddress/address1/home/address1/blahblahblahblahblahblahblahblah'
FOR XML PATH('')
will give an error indicating that the identifier is too long and it should not exceed 128 characters. But the output expected from the query is:
<root>
<orderdatabase>
<allorders>
<customer>
<information>
<orderaddress>
<shippingaddress>
<address1>
<home>
<address1>
<blahblahblahblahblahblahblahblah>value</blahblahblahblahblahblahblahblah>
</address1>
</home>
</address1>
</shippingaddress>
</orderaddress>
</information>
</customer>
</allorders>
</orderdatabase>
</root>
In most of the scenarios in our real world code this might be required. We can resolve this with a workaround using sub queries which will return an xml which is subset of the parent xml. Following is the sample query to resolve the above issue:
SELECT '' 'orderdatabase/allorders/customer/information/orderaddress',
(
SELECT 'value' 'shippingaddress/address1/home/address1/blahblahblahblahblahblahblahblah'
FOR XML PATH(''), type
) AS 'orderdatabase/allorders/customer/information/orderaddress'
FOR XML PATH(''),root('root')
We can refer any of the sql table columns using {sql:column("column name")}.
This is a simple tip/work around for long nested xml's from a query.
Labels:
SQL Server 2005,
SQL Server 2008,
XML
How to use Multiple DataReaders in ADO.Net
Most of the folks says that we cannot use one more DataReader when one DataReader is Opened. It is obsolutely correct upto ADO.Net 1.0 version.
With ADO.Net 2.0 we can create DataReader while another DataReader is opened on the same SqlConnection.
Please note that the second DataReader should use the same SqlConnection.
Following is the sample to demonstrate the same (in C#):
static void Main(string[] args)
{
SqlConnection objCon = null;
try
{
string sConString = "Data Source=.\\sqlexpress;Initial Catalog=DB1;Integrated Security=True;MultipleActiveResultSets=true";
SqlDataReader dr1 = null, dr2 = null;
objCon = new SqlConnection();
objCon.ConnectionString = sConString;
SqlCommand objCmd = new SqlCommand();
objCmd.CommandText = "select top 10 * from Page";
objCmd.Connection = objCon;
SqlCommand objCmd1 = new SqlCommand();
objCmd1.Connection = objCon;
objCon.Open();
dr1 = objCmd.ExecuteReader();
while (dr1.Read())
{
Console.WriteLine(dr1.GetInt32(0).ToString());
objCmd1.CommandText = "select top 10 * from PageData Where PageId=" + dr1.GetInt32(0).ToString();
// Creating the Second DataReader
dr2 = objCmd1.ExecuteReader();
while (dr2.Read())
{
Console.WriteLine(dr2.GetInt32(1));
}
// Closing the Data Reader
dr2.Close();
}
// Closing the Data Reader
dr1.Close();
}
catch (Exception objExp)
{
Console.WriteLine("Exception: " + objExp.Message);
}
finally
{
if (objCon != null)
{
objCon.Close();
}
}
}
Please note that in the Connection String we have to add "MultipleActiveResultSets=true" for allowing mutiple DataReaders on the same Connection.
Wednesday, July 22, 2009
Fusion Charts for SharePoint List
Most of the time when ever we have data, end users will expect some kind of reports/charts.
For example when we are using tasks, we may have to provide a pie chart indicating the different status in the pie chart. Or We may have to show a visual indicator for the percentage completion for each task item.
We can create the charts by using any of the tools on MOSS 2007:
1. Excel Services (Excel Web Access)
2. Reporting Services
3. Silver Light, etc
In order to use these features we should have MOSS 2007 License and also some environments there will be restrictions on custom coding. By keeping this points in mind I came up with this Post.
Here we will see how we can utilize the Fusion Charts for the SharePoint List (Task List). Following image shows the sample Task List:

Following are the steps to implement the fusion charts:
1. Download Fusion Charts and upload to a document library. In this case I created a separate document library called FusionCharts where all the fusion charts are uploaded.
2. Come up with the RPC Protocol URL for extracting the data from the task list.
In our case following is the URL:
http://localhost/sites/MOSSDemos/_vti_bin/owssvr.dll?Cmd=Display&Query=Status&List=%7B7C6C7072%2D12B5%2D4B05%2D90A4%2D052160CC8F74%7D&XMLDATA=TRUE
Note that we are extracting only the Status field from the Task List.
And the List id is the Task List Guiid within the SharePoint Site.
3. Copy the following javascript into the content editor web part:
<script language="javascript">
function fnXmlHttp(AspFileName,strXML)
{
var objXMLHttp= new ActiveXObject("Microsoft.XMLHTTP");
var sResponse;
try
{
objXMLHttp.open("POST",AspFileName,false) //POSTING THE DATA
objXMLHttp.setRequestHeader("Content-Type", "text/xml");
objXMLHttp.send(strXML)
}
catch(e)
{
}
if (parseInt(objXMLHttp.Status) != 200)
{
sResponse = "N,Cannot connect to the Server.";
}
else
{
sResponse=new String(objXMLHttp.responseText);
if (sResponse == "")
{
sResponse = "N,Error at server. Please contact administrator.";
}
}
return sResponse;
}
var sXML;
var bLoad;
var sSiteUrl = "http://localhost/sites/MOSSDemos/_vti_bin/owssvr.dll?";
// This Parameter Contains List Id too
var sCmdParameters = "Cmd=Display&Query=Status&List=%7B7C6C7072%2D12B5%2D4B05%2D90A4%2D052160CC8F74%7D&XMLDATA=TRUE"
// Request the RPC Call
sXML = fnXmlHttp(sSiteUrl + sCmdParameters,"");
// Create the XML Object Instance
var objXML = new ActiveXObject("MSXML2.DOMDocument");
// Load the XML
bLoad = objXML.loadXML(sXML);
// Check whether the XML is loaded into the document
if(bLoad)
{
// Declare all local variables
var iNotStarted = 0;
var iInProgress = 0;
var iCompleted = 0;
var iDeferred = 0;
var iWaitingonsomeoneelse = 0;
var sObjectData;
var objData = objXML.documentElement.childNodes(1);
// Loop through all the variables
for (i=0;i<objData.childNodes.length;i++)
{
var Status = objData.childNodes(i).attributes.getNamedItem("ows_Status").value;
switch(Status)
{
case "Not Started":
iNotStarted = iNotStarted + 1; break;
case "In Progress":
iInProgress = iInProgress + 1; break;
case "Completed":
iCompleted = iCompleted + 1; break;
case "Deferred":
iDeferred = iDeferred + 1; break;
case "Waiting on someone else":
iWaitingonsomeoneelse = iWaitingonsomeoneelse + 1; break;
default:
break;
}
}
// Create the Object for the Fusion Chart
// Opening Object Tag
sObjectData = "<object classid=\"clsid:D27CDB6E-AE6D-11cf-96B8-444553540000\" ";
sObjectData += "codebase=\"http://download.macromedia.com/pub/shockwave/cabs/flash/swflash.cab#version=6,0,0,0\" ";
sObjectData += "width=\"400\" ";
sObjectData += "height=\"300\" ";
sObjectData += "id=\"Pie3D\"> ";
// Setting Parameters
sObjectData += "<param name=\"movie\" value=\"http://localhost/sites/MOSSDemos/FusionCharts/FusionCharts/FCF_Pie3D.swf?chartWidth=400&chartHeight=300\"> ";
sObjectData += "<param name=\"FlashVars\" value=\"&dataXML=<graph caption='Tasks By Status Percentage' ";
sObjectData += "xAxisName='Site' yAxisName='Qty by Site' showNames='1' decimalPrecision='1' showPercentageInLabel='1' formatNumberScale='0' ";
sObjectData += "pieYScale='70' pieBorderAlpha='40' pieFillAlpha='80' pieSliceDepth='15'> ";
sObjectData += "<set name='Not Started' value='" + iNotStarted + "' color='#660033' link='' /> ";
sObjectData += "<set name='Completed' value='" + iInProgress + "' color='#3399ff' link='' /> ";
sObjectData += "<set name='In Progress' value='" + iCompleted + "' color='#99cc99' link='' /> ";
sObjectData += "<set name='Deferred' value='" + iDeferred + "' color='#00ff99' link='' /> ";
sObjectData += "<set name='Waiting for someone else' value='" + iWaitingonsomeoneelse + "' color='#000033' link='' /> ";
sObjectData += "</graph>\"> ";
sObjectData += "<param name=\"quality\" value=\"high\"> ";
sObjectData += "</object> ";
document.write(sObjectData);
}
</script>
Following are the lines to be changed in the script:
A. Location of the FCF_Pie3D.swf file within the "object" tag.
B. Site Url in the variable "sSiteUrl".
C. Task List Id in the variable "sCmdParameters".
With this, A Pie chart representations the Task Data within the SharePoint List as shown below:

For example when we are using tasks, we may have to provide a pie chart indicating the different status in the pie chart. Or We may have to show a visual indicator for the percentage completion for each task item.
We can create the charts by using any of the tools on MOSS 2007:
1. Excel Services (Excel Web Access)
2. Reporting Services
3. Silver Light, etc
In order to use these features we should have MOSS 2007 License and also some environments there will be restrictions on custom coding. By keeping this points in mind I came up with this Post.
Here we will see how we can utilize the Fusion Charts for the SharePoint List (Task List). Following image shows the sample Task List:

Following are the steps to implement the fusion charts:
1. Download Fusion Charts and upload to a document library. In this case I created a separate document library called FusionCharts where all the fusion charts are uploaded.
2. Come up with the RPC Protocol URL for extracting the data from the task list.
In our case following is the URL:
http://localhost/sites/MOSSDemos/_vti_bin/owssvr.dll?Cmd=Display&Query=Status&List=%7B7C6C7072%2D12B5%2D4B05%2D90A4%2D052160CC8F74%7D&XMLDATA=TRUE
Note that we are extracting only the Status field from the Task List.
And the List id is the Task List Guiid within the SharePoint Site.
3. Copy the following javascript into the content editor web part:
<script language="javascript">
function fnXmlHttp(AspFileName,strXML)
{
var objXMLHttp= new ActiveXObject("Microsoft.XMLHTTP");
var sResponse;
try
{
objXMLHttp.open("POST",AspFileName,false) //POSTING THE DATA
objXMLHttp.setRequestHeader("Content-Type", "text/xml");
objXMLHttp.send(strXML)
}
catch(e)
{
}
if (parseInt(objXMLHttp.Status) != 200)
{
sResponse = "N,Cannot connect to the Server.";
}
else
{
sResponse=new String(objXMLHttp.responseText);
if (sResponse == "")
{
sResponse = "N,Error at server. Please contact administrator.";
}
}
return sResponse;
}
var sXML;
var bLoad;
var sSiteUrl = "http://localhost/sites/MOSSDemos/_vti_bin/owssvr.dll?";
// This Parameter Contains List Id too
var sCmdParameters = "Cmd=Display&Query=Status&List=%7B7C6C7072%2D12B5%2D4B05%2D90A4%2D052160CC8F74%7D&XMLDATA=TRUE"
// Request the RPC Call
sXML = fnXmlHttp(sSiteUrl + sCmdParameters,"");
// Create the XML Object Instance
var objXML = new ActiveXObject("MSXML2.DOMDocument");
// Load the XML
bLoad = objXML.loadXML(sXML);
// Check whether the XML is loaded into the document
if(bLoad)
{
// Declare all local variables
var iNotStarted = 0;
var iInProgress = 0;
var iCompleted = 0;
var iDeferred = 0;
var iWaitingonsomeoneelse = 0;
var sObjectData;
var objData = objXML.documentElement.childNodes(1);
// Loop through all the variables
for (i=0;i<objData.childNodes.length;i++)
{
var Status = objData.childNodes(i).attributes.getNamedItem("ows_Status").value;
switch(Status)
{
case "Not Started":
iNotStarted = iNotStarted + 1; break;
case "In Progress":
iInProgress = iInProgress + 1; break;
case "Completed":
iCompleted = iCompleted + 1; break;
case "Deferred":
iDeferred = iDeferred + 1; break;
case "Waiting on someone else":
iWaitingonsomeoneelse = iWaitingonsomeoneelse + 1; break;
default:
break;
}
}
// Create the Object for the Fusion Chart
// Opening Object Tag
sObjectData = "<object classid=\"clsid:D27CDB6E-AE6D-11cf-96B8-444553540000\" ";
sObjectData += "codebase=\"http://download.macromedia.com/pub/shockwave/cabs/flash/swflash.cab#version=6,0,0,0\" ";
sObjectData += "width=\"400\" ";
sObjectData += "height=\"300\" ";
sObjectData += "id=\"Pie3D\"> ";
// Setting Parameters
sObjectData += "<param name=\"movie\" value=\"http://localhost/sites/MOSSDemos/FusionCharts/FusionCharts/FCF_Pie3D.swf?chartWidth=400&chartHeight=300\"> ";
sObjectData += "<param name=\"FlashVars\" value=\"&dataXML=<graph caption='Tasks By Status Percentage' ";
sObjectData += "xAxisName='Site' yAxisName='Qty by Site' showNames='1' decimalPrecision='1' showPercentageInLabel='1' formatNumberScale='0' ";
sObjectData += "pieYScale='70' pieBorderAlpha='40' pieFillAlpha='80' pieSliceDepth='15'> ";
sObjectData += "<set name='Not Started' value='" + iNotStarted + "' color='#660033' link='' /> ";
sObjectData += "<set name='Completed' value='" + iInProgress + "' color='#3399ff' link='' /> ";
sObjectData += "<set name='In Progress' value='" + iCompleted + "' color='#99cc99' link='' /> ";
sObjectData += "<set name='Deferred' value='" + iDeferred + "' color='#00ff99' link='' /> ";
sObjectData += "<set name='Waiting for someone else' value='" + iWaitingonsomeoneelse + "' color='#000033' link='' /> ";
sObjectData += "</graph>\"> ";
sObjectData += "<param name=\"quality\" value=\"high\"> ";
sObjectData += "</object> ";
document.write(sObjectData);
}
</script>
Following are the lines to be changed in the script:
A. Location of the FCF_Pie3D.swf file within the "object" tag.
B. Site Url in the variable "sSiteUrl".
C. Task List Id in the variable "sCmdParameters".
With this, A Pie chart representations the Task Data within the SharePoint List as shown below:

Tuesday, July 21, 2009
SharePoint List Data Access
In this post we will see what are the different ways that we extract the data from the SharePoint List at a higher and this will be the basic for the future posts. List can be a Custom List, Document Library, or Survey.
Following are the different ways of accessing data from a list at a broad level:
1. Using Object Model
2. Using Web Services
3. Using Remote Procedure Calls
SharePoint Object Model
There are rich set of APIs for accessing the SharePoint List. Most of the times we will be using following objects:
A. SPSite -> Represents Site Collection
B. SPWeb -> Represents a Web (which is a sub site)
C. SPList -> Represents a List (Can be a Custom List/Document Library etc)
D. SPListItem -> Represents an Item in a List
Apart from these classes we may be using SPFolder, SPFile, etc classes too.
More info is available @ SharePoint Object Model
Please note that we will be using the SharePoint Object in the custom applications/Web Parts which will be hosting on the Same SharePoint Servers.
Web Services
The other approach of accessing the data using sharepoint web services.
For example we can use Lists.asmx for accessing the data from a List.
Like this we have lots of web services for accessing the data from SharePoint. You can get list of web services @ List of SharePoint Web Services
Since it is a web service, we can use in any custom applications and it can be hosted on SharePoint Server or any other server.
Using Remote Procedure Calls
From SharePoint 2003, we have one more approach for accesing the sharepoint data using RPC Protocal.
Following is the syntax:
http://Server_Name/[sites/][Site_Name/]_vti_bin/owssvr.dll?Cmd=
Method_name[&Parameter1=Value1&Parameter2=Value2...]
Here we are just providing the method and parameters to query the sharepoint database. For example if we want to access the sharepoint task list we can provide the following URL:
http://localhost/sites/DemoSite/_vti_bin/owssvr.dll?Cmd=Display&List=%7B2E5E526D%2D993C%2D45B9%2DAF0F%2DDE71F8985220%7D&XMLDATA=TRUE&Query=*
In the url, we are specifying the following parameters:
Method Name: Display -> For fetching the data
Parameter: List -> For providing the List Id (GUID)
Parameter: XMLDATA -> For extracting data in the xml format
Parameter: Query -> To provide list of column names separated by the space. * indicates all the columns.
You can get complete list of commands and their parameters @ URL Protocol
This post is the basics for the upcoming post on Displaying Data in a graphical format as shown below:

Monday, July 20, 2009
Custom XML from a Query
Most of us knows that SQL Server 2000 supports following xml clause:
1. FOR XML AUTO
2. FOR XML RAW
3. FOR XML EXPLICIT
Using any of these we can get the xml output from a query. We will be using FOR XML Explicit for getting the custom format of the xml, but it is little difficult in writing the query where we have to use set operator "UNION" for the set of queries.
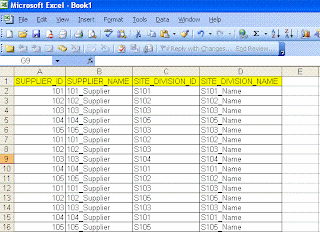
Today one of my team member asked a question where he is looking for an xml from the Excel file and he said it is a one time implementation with the custom format. I thought of sharing with everyone through my blog:
Following is the Excel format:
Following is the output format they are looking for:
<root>
<sup id="101" name="101_Supplier">
<site id="S101">S101_Name</site>
<site id="S102">S102_Name</site>
<site id="S103">S103_Name</site>
</sup>
<sup id="102" name="102_Supplier">
<site id="S102">S102_Name</site>
<site id="S103">S103_Name</site>
<site id="S105">S105_Name</site>
</sup>
</root>
If we observer the xml format it is not a striaght farword, because each suplier has one to many relationship. We can achive it using FOR XML Path in SQL Server 2005 onwards. Here are the steps to follow:
We can create the table in sql server with the same format mentioned in the excel. Here is the sample script after loading the data into the sql server table using export import wizard:
CREATE TABLE [dbo].[SUPDATA](
[SUPPLIER_ID] [varchar](255) COLLATE SQL_Latin1_General_CP1_CI_AS NULL,
[SUPPLIER_NAME] [varchar](255) COLLATE SQL_Latin1_General_CP1_CI_AS NULL,
[SITE_DIVISION_ID] [varchar](255) COLLATE SQL_Latin1_General_CP1_CI_AS NULL,
[SITE_DIVISION_NAME] [varchar](255) COLLATE SQL_Latin1_General_CP1_CI_AS NULL
) ON [PRIMARY]
Following is the query to get the data in the required xml format:
SELECT
SUPPLIER_ID '@id',
SUPPLIER_NAME '@name',
(
SELECT SITE_DIVISION_ID 'site/@id',
SITE_DIVISION_NAME 'site'
FROM SUPDATA I
WHERE I.SUPPLIER_ID = O.SUPPLIER_ID
FOR XML PATH (''), type
)
FROM
(SELECT DISTINCT SUPPLIER_ID, SUPPLIER_NAME FROM dbo.SUPDATA) O
FOR XML path('sup'),root('root')
If you observe carefully in the query, we used type keyword following FOR XML PATH to make sure that the inner query returns xml and should be available without any tag encryption.
This type of queries helps us in converting data into the required xml formats.
1. FOR XML AUTO
2. FOR XML RAW
3. FOR XML EXPLICIT
Using any of these we can get the xml output from a query. We will be using FOR XML Explicit for getting the custom format of the xml, but it is little difficult in writing the query where we have to use set operator "UNION" for the set of queries.
Today one of my team member asked a question where he is looking for an xml from the Excel file and he said it is a one time implementation with the custom format. I thought of sharing with everyone through my blog:
Following is the Excel format:

Following is the output format they are looking for:
<root>
<sup id="101" name="101_Supplier">
<site id="S101">S101_Name</site>
<site id="S102">S102_Name</site>
<site id="S103">S103_Name</site>
</sup>
<sup id="102" name="102_Supplier">
<site id="S102">S102_Name</site>
<site id="S103">S103_Name</site>
<site id="S105">S105_Name</site>
</sup>
</root>
If we observer the xml format it is not a striaght farword, because each suplier has one to many relationship. We can achive it using FOR XML Path in SQL Server 2005 onwards. Here are the steps to follow:
We can create the table in sql server with the same format mentioned in the excel. Here is the sample script after loading the data into the sql server table using export import wizard:
CREATE TABLE [dbo].[SUPDATA](
[SUPPLIER_ID] [varchar](255) COLLATE SQL_Latin1_General_CP1_CI_AS NULL,
[SUPPLIER_NAME] [varchar](255) COLLATE SQL_Latin1_General_CP1_CI_AS NULL,
[SITE_DIVISION_ID] [varchar](255) COLLATE SQL_Latin1_General_CP1_CI_AS NULL,
[SITE_DIVISION_NAME] [varchar](255) COLLATE SQL_Latin1_General_CP1_CI_AS NULL
) ON [PRIMARY]
Following is the query to get the data in the required xml format:
SELECT
SUPPLIER_ID '@id',
SUPPLIER_NAME '@name',
(
SELECT SITE_DIVISION_ID 'site/@id',
SITE_DIVISION_NAME 'site'
FROM SUPDATA I
WHERE I.SUPPLIER_ID = O.SUPPLIER_ID
FOR XML PATH (''), type
)
FROM
(SELECT DISTINCT SUPPLIER_ID, SUPPLIER_NAME FROM dbo.SUPDATA) O
FOR XML path('sup'),root('root')
If you observe carefully in the query, we used type keyword following FOR XML PATH to make sure that the inner query returns xml and should be available without any tag encryption.
This type of queries helps us in converting data into the required xml formats.
Thursday, July 16, 2009
SharePoint 2010 Silent Features
In continuation to my previous post on SharePoint 2010 sneak preview.
SharePoint 2010 is the business collobaration platform for the web enterprise that enables to connect and empower people through an integrated set of rich features.
Following are the few silent features from SharePoint 2010 version which I obeserved from the sneak preview. I will be explaining these features and how we can utilize them in our regular job by comparing with the existing version - SharePoint 2007.
Web Edit
This is an excellent feature where the content authors can modify the content inline on the page much quickly and easily when compared to SharePoint 2007. They can also view the preview immediately while changing the fonts or font size...
New User Interface
Now you can find the completely new user interface very much similar to the Office 2007, nothing but the Ribons. It has a contextual interface which makes the user to access the content with very less number of clicks and better performance.
User inteface is integrated with the Asynchronous access. Now its easy for the users to act easily on mutiple items in a single shot. For example when we want to checkout multiple files in a document library, we have to do those many number of time. Now we can do it in a single shot by selecting mutiple files in a document library.
Even you can see the revamped UI for the Central Administration. This makes the administrator to complete their job quickly and easily...
Seamless Image Uploading
In SharePoint 2007, when ever we want to show an image on a page, we will upload the image to a Picture Library and then we will provide the image link on the page. Now we can keep a pull stop for the long way doing this activity... We can seemlessly upload the images while we are editing the content using the Web Edit feature. You can resize the image with in the same browser.
Rich Themes
Apart from the out of the box themes, now you can we import the themes from the office. For example if you want to import the theme from a powerpoint, yes you can import the theme(colors, fonts, etc) to your sharepoint site with same look and feel across all the browsers.
Visio Web Access
In SharePoint 2007 we have a feature of publishing the Excell directly on to a web. Users can access the excell without having any dependency of excell installation on the client machine, which is great feature. Now in SharePoint 2010 Microsoft extended the similar concept to Visio. Using Visio 2010 we can publish the Visio diagrams onto the SharePoint Site and the users can directly access the same using the browser without any installation on the client machine.
BDC -> BCS
Now Business Data Catalog is Business Connectivity Services. Using BCS you can read and write data directly from your Line of Business Data. We can use either SharePoint Designer or Visual Studio to implement the same.
BCS has connectivity to LOB, Web Services, Databases and display the data in a friendly way enabling users to interact and update it easily on the web, offcourse on office client too.
Silverlight WebPart
Now Silverlight web part is available out of the box.
SharePoint Workspace
Most of the times we want to do the work offline on a list of items and then sync with the sharepoint list. We dont have any other option than going with an Excel. Now with SharePoint Workspace, we can take the sharepoint data offline to work and sync whenever hook to the network.
Usage Reports
There is a central database in the SharePoint Server farm to log usage data and also the health data. This provide us with different varities of usage reports which is not available in current version.
In a summary, SharePoint 2010 has a set of rich fetures for all different categories of users like administrators, IT Professions, Developres and End Users.
Thanks,
-Sri
Tuesday, July 14, 2009
Sneak Preview on MOSS 2010
There were few videos on MOSS 2010 for categories like
1. MOSS 2010 Overview
2. MOSS 2010 for IT Professionals
3. MOSS 2010 for IT Developers
Have a look at it...
1. MOSS 2010 Overview
2. MOSS 2010 for IT Professionals
3. MOSS 2010 for IT Developers
Have a look at it...
Subscribe to:
Comments (Atom)