Microsoft SQL Server PowerPivot extends SharePoint and Excel Services to add server side process for the PowerPivot workbooks published to SharePoint.
In this blog I am going to explain on how to install and configure Analysis Service in SharePoint Mode. First lets look at the software requirements:
- SQL Server 2012 Service Pack1
- SharePoint 2013 Enterprise Edition
- PowerPivot add-in for SharePoint 2013
I am going to add one more virtual server "VMServer20" to the existing SharePoint farm explained in my previous post "Configuring Office Web Apps 2013 with SharePoint 2013" as shown below:
Here are the basic steps for this installation & configurations:
1. Installing PowerPivot for SharePoint
2. Configuring the Analysis Service in SharePoint Mode
3. Installing PowerPivot on SharePoint Servers
4. Configure PowerPivot for SharePoint
5. Verifying with a Sample
Step-1: Installing PowerPivot for SharePoint:
Run SQL Server Setup on the Server where you want to install SQL Server PowerPivot for SharePoint, in my case it is VMServer21. Make sure that the server is added to the Domain and run the setup as an administrator and also make sure you logged in with the Setup Account:
Click on the New SQL Server stand-alone installation or add features to an existing installation
Click OK to continue (make sure all the supported rules are passed)
Provide the license key and Click Next to continue
Select the I accept the license terms and Click Next to continue
Click Next to Continue, in case of any warnings for Windows Firewall rule, you can fix it ever after installing. It also might vary based on which environment we are setting up this server (like DMZ).
Here is the important step for this installation, Select SQL Server PowerPivot for SharePoint and Click Next to proceed further.
In this step Optionally you can select Add SQL Server database relation service engine to this installation in case if you want add this server as a content database to the SharePoint farm.
Click Next to proceed. If required you can change the default directory path.
Click Next to Proceed further.
This is another important step in this installation, make sure that the powerpivot instance is available on the server as its mandatory to install only on named instance called "POWERPIVOT".
Click Next to proceed.
Click Next to Proceed.
Provide the domain account on which you want to run this service and Click Next to continue.
If you want to run the instance in Mixed Mode, provide the password for the SA account. Add the current user to the administrators list. Click Next to proceed.
Add the current user to the Administrators list and click Next to continue.
Click Next to proceed.
Click Next to Proceed.
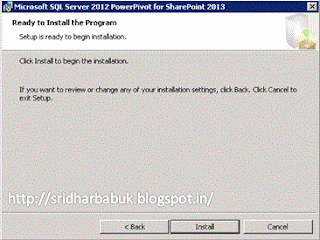
Click Next to Proceed with the Installation.
With this we completed installing SQL Server PowerPivot for SharePoint.
Step-2: Configuring the Analysis Service in SharePoint Mode:
Configure the Excel Services Domain Account which is configured in the SharePoint as part of the Administrator in the Analysis Service. In order to add this account, Open Management Studio & connect to the Analysis Service (VMServer20\PowerPivot) -> Right Click and select properties and Add the account as shown below:
Step-3: Installing PowerPivot Add-In for SharePoint:
Download and install Powerpivot Add-In for SharePoint on all the Web Front End Servers as well as on App Servers. First start with installing on the Central Admin Server by running spPowerPivot.msi
Click Next to Continue.
Accept the License Terms and Click Next to Continue.
Click Next to Continue.
Click Install to initiate the installation.
Click Finish to complete the installation of PowerPivot Add-In for SharePoint.
Step-4: Configuring PowePivot for SharePoint
Open the PowerPivot for SharePoint 2013 Configuration tool in Central Admin Server as shown below:
Select Configure or Repair Powerpivot and Click OK to continue.
Provide the Default Domain Account, Content Database and PowerPivot database instance. Click on Validate to verify the configurations.
Click Run to provision the PowerPivot Service Application in the Farm.
With this we completed the configurations. Now we are ready to verify the same.
Now you can install the PowerPivot Add-In on all the other servers in the SharePoint farm.
Step-5: Verifying the Configurations
You can verify the configurations by Browsing to the Central Admin -> Manage Service Applications, You will see new Service Application called "Default PowerPivot Service Application" as shown in the following image:
Click on Excel Service and Select Manage from the ribbon.
Select Data Model Settings and you will see the PowerPivot instance of the Analysis Service.
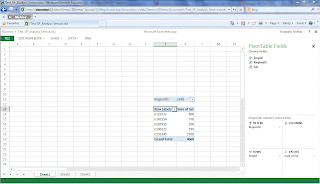
Now lets open a sample excel workbook which is published to excel and try slicing the data.
With this we completed Installing, Configuring & Validating the SQL Server PowerPivot for SharePoint 2013.
Let me know your comments!!!


1 comment:
Thank you for your detail guide for the installation, it is very userful for the newbie like me.
Post a Comment